Vonage for Service Cloud Voice integrates Vonage Contact Center (VCC) with Salesforce's Service Cloud Voice. For information about Service Cloud Voice and its benefits, see Service Cloud Voice (Salesforce help). Vonage for Service Cloud Voice enables Salesforce to deliver these benefits using VCC.
For information about using Service Cloud Voice features, see Help Customers on the Phone (Salesforce help).
| In this page |
|---|
Making and receiving calls
Using SCV with VCC you can make and receive calls.
To make an outbound call using SCV, click a phone number in a Salesforce record, or enter the phone number in the Omni-Channel utility.
When an inbound call is routed to you by VCC, the call appears in the Omni-Channel utility in Salesforce.
Desktop notifications for inbound calls
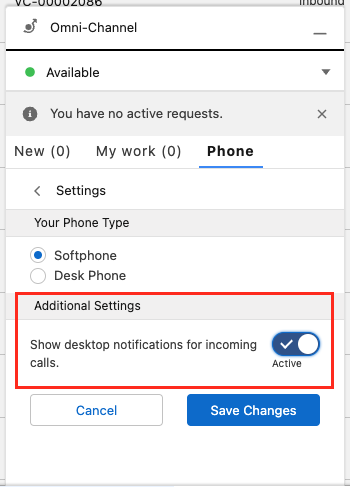
The Omni-Channel utility can also present a desktop notification when you receive an inbound call. To enable the notifications, click the Phone tab in the utility and then click the gear icon. In Additional Settings, turn on the Show desktop notifications for incoming calls toggle.
The first time SCV tries to send you a desktop notification, your browser will ask you to allow notifications. Click to allow notifications.
The notification appears in the lower-right corner (Windows) or upper-right corner (Mac) of your computer's desktop in your primary monitor. If you block notifications, notifications will not appear.
While connected to an inbound or outbound call, you can work with that call in the Omni-Channel utility. You can mute the call, put the call on hold, record the call, and so on. For information about making and receiving calls in SCV, see Answer and Make Calls (Salesforce help).
Making calls with Connect (dialer) in Vonage for Service Cloud Voice
If Connect is installed and configured for use with Service Cloud Voice, you can use Connect to make outbound calls. For information about using Connect, see Making calls using Connect.
Using Connect with Service Cloud Voice is slightly different from using Connect with ContactPad. The following information describes the behavior specific to using Connect with Service Cloud Voice.
You will not need to log in to ContactPad as described. Instead you must have set your availability so you can make and receive calls in the Omni-Channel utility. Additionally, the steps relating to Log a Call do not apply.
When you make a call, a voice call appears in the Omni-Channel utility as described in the Making and receiving calls section earlier in this page.
To end a call using Connect in Vonage for Service Cloud Voice, click End Call in the Omni-Channel utility and close the related call record or end your after conversation work. The previous call is marked as complete. Until you have completely finished working with the call by closing the related call record, clicking Next in Connect won't have any effect.
Consulting, transferring, and conferencing (or merging) calls
When using SCV with VCC, you can consult, transfer, and merge calls.
While on call, you can add another agent to consult with them about the call. To do so, click Add Caller and select an agent from the list that appears.
Identifying agents
You can identify agents by the following icon:
Their availability is shown in brackets after their names, for example, "(Available)", "(Busy)", or "(Offline)". For information about availabilities, see Add Callers or Transfer Calls (Salesforce help).
This puts the original call on hold while you are connected to the agent chosen from the list. You can then perform one of the following actions:
- Swap between original call and consult.
- End the consult.
- Perform a warm transfer to the other agent (by leaving the call yourself).
- Combine the original call with the consult. Combining the calls is known as merging in SCV—merging is called conferencing in VCC.
You can also consult with an external number. To do so, click Add Caller, then—instead of selecting an agent—click Keypad, and enter a number to consult with. This puts the original call on hold while you are connected to the external number. You can then perform the same actions as if you were consulting with an agent.
Alternatively, you can consult with a VCC interaction plan—or, more specifically, a VCC agent servicing the interaction plan—or transfer (warm or cold) to an interaction plan. To do so, click Add Caller and select an interaction plan from the presented list.
Identifying interaction plans
You can identify interaction plans by the following icon:
This puts the original call on hold while you are connected to the interaction plan. You can either hang up to perform a cold transfer to the interaction plan, or wait to be connected to an agent to consult. You you wait to be connected, on connection, you can perform the same tasks as described for a consult to agent in the previous paragraph.
For information about consulting, transferring, and merging calls, see Add Callers or Transfer Calls (Salesforce help).
With external routing
If external routing has been enabled for your account, in addition to phone calls, you can transfer the following interaction types:
- Chats. Use the transfer button in the chat interface to transfer a chat to any of the following. For information about transferring a chat, see Transfer Chats (Salesforce help).
A user
A chat button
A Salesforce queue
- A Salesforce skill
Cases. You can transfer a case by changing the case owner to one of the following. For information about transferring a record by changing the record's owner, see Change a Record’s Owner (Salesforce help).
A user
A Salesforce queue
With Vonage Contact Center and Vonage Business Communications integration
If your VCC and VBC accounts are integrated, when you click Add Caller in the Omni-Channel utility your contacts list includes contacts in your VBC account along with the usual agents, queues, and interaction plans.
Identifying VBC users
You can identify VBC users by the following icon:
"(VBC)" is also added to the end of their user name.
Their availability is shown in brackets after their names, for example, "(Available)" or "(Busy)". For information about availabilities, see Add Callers or Transfer Calls (Salesforce help). Note that, due to a limitation, VBC users appear as Available even when logged out.
You can consult with a VBC user, and optionally transfer the call to them. Alternatively, you can merge the original and consult calls.
To show only VBC and other directory users, in the transfer list, filter Search Transfer Destinations by Directory.
With Vonage Contact Center and Microsoft Teams integration
If your VCC and Microsoft Teams accounts are integrated, when you click Add Caller in the Omni-Channel utility your contacts list includes contacts in your Microsoft Teams account along with the usual agents, queues, and interaction plans.
Identifying Teams users
You can identify Teams users by the following icon:
"(Teams)" is also added to the end of their user name.
Their availability is shown in brackets after their names, for example, "(Available)" or "(Busy)". The mapping between VCC and Microsoft Teams presences can be configured by an administrator.
Availability will be two-way synced between the systems so, if a user is set to Busy in Teams, they will be set to the same in SCV.
For information about availabilities, see Add Callers or Transfer Calls (Salesforce help).
You can consult with a Teams user, and optionally transfer the call to them. Alternatively, you can merge the original and consult calls.
To show only Microsoft Teams and other directory users, in the transfer list, filter Search Transfer Destinations by Directory.
Transcription
If SCV and transcription are enabled for your account, Vonage transcribes your calls. Transcription turns your customer's and your speech into text in real time. During a call, the transcript appears in the call's voice call record so you can see the transcription text alongside customer data.
Supervisor listen-in
If supervisor listen-in (monitoring) is enabled for your account, and you are a supervisor, you will be able to listen in to calls.
The calls you can listen in to must be in progress and belong to agents in groups you have read or write permission to. You will only have audio available to you.
To listen in to a call, perform the following steps:
- Go to the Omni Supervisor app in the app selector.
- Click the arrow next to the agent whose call you want to listen in to.
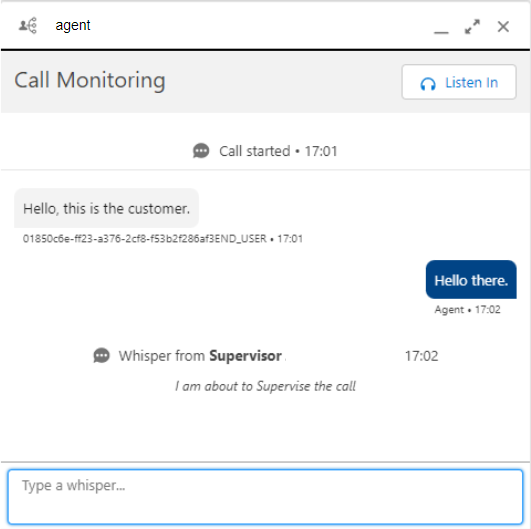
- Click Monitor. The Call Monitoring panel appears and contains a transcript of the selected call. The agent will be notified of your presence in their Conversation panel.
If whisper messaging is enabled, you can send the agent messages through the Call Monitoring panel.
Your messages will appear in the agent's Conversation panel. Click Listen In in Call Monitoring. You will join the call — you may need to accept the call using your soft or hard phone, depending on which you are configured to use. When you have joined the call, you will not have access to any call controls, such as mute, record, consult, and so on.
Because you are not an active participant in the call, Salesforce will not present you with a voice call record.- To end the call, click Leave Call. Alternatively, the call will end when the agent or customer ends when the interaction you are listening-in to ends.
If the agent clicks to consult with another party while you are supervising their call, you will no longer be able to listen in to the call.
Using WebRTC with Vonage for Service Cloud Voice
No ringing tone
If you are using WebRTC with Vonage for Service Cloud Voice, you might not hear the ringing tone sometimes when you receive an inbound call. This is due to your browser not allowing audio to autoplay in a tab that you have not interacted with. To hear the ringing tone when you receive an inbound call, you must click somewhere in the Salesforce browser window.


