Enabling an agent to use Connect
How can I enable an agent to use Connect?
For an agent to use Connect, the agent must have a user record, with an associated agent ID, and the Can Dial Lists via Connect check box, on the user record, selected. User records do not, by default, have the check box so you must add the check box to the record.
- Creating or editing custom settings for Connect
- Adding Connect to Salesforce Classic apps
- Adding Connect to Salesforce Lightning Experience apps
- Adding Dial List description to page layout
- Setting up a Create Dial List button
- Adding a custom button to a Dial List list view
- Setting up users, permissions and sharing rules
- Enabling an agent to use Connect
- Configuring Connect (optional tasks)
To add the check box to a user record, perform the following steps:
- Go to the Administration Setup Page in Salesforce.
- Scroll down until you see the Administration Setup section on the left-hand side. In the section, expand Manage Users.
- In the expanded list of items, click Users. All Users appears.
- Open the user record you want to modify by clicking the username. The user record appears.
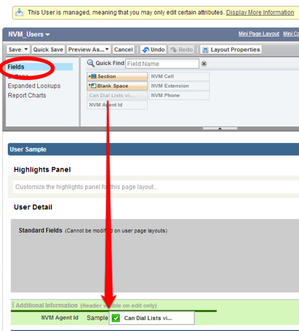
In the upper-right section of the user record, click Edit Layout.
An editable version of the user record appears.
Ensure that Fields is selected.
Drag Can Dial Lists via Connect to the Additional Information section, above the NVM Agent Id.
- Click Save. The user record appears with the Can Dial Lists via Connect check box.
- Click Edit. User Edit appears.
Locate and select Can Dial Lists via Connect in the Additional Information section on the user record.
Click Save.
You must also provide the correct NVM Agent Id for the associated agent.
The agent can now use Connect.
Related content
For general assistance, please contact Customer Support.
For help using this documentation, please send an email to docs_feedback@vonage.com. We're happy to hear from you. Your contribution helps everyone at Vonage! Please include the name of the page in your email.


