Configuring virtual queues
If enabled for your account, you can use Virtual Queues to create virtual queues. For information about where Vonage Contact Center uses virtual queues, see Real-time Analytics, Agreement based routing and Priority call handling in ContactPad.
In the Virtual Queues user interface, you can use the TAB key to move between fields and buttons in a logical order.
How do I create a new virtual queue in Vonage Contact Center?
If you want to report on virtual queue activity and use information for workforce management, you must create virtual queues. If you want Vonage Contact Center to prioritize interactions based on service level agreements, set service level targets for the virtual queues. A service level agreement is the percentage of calls that must be answered within the target time period.
To create a virtual queue, perform the following steps:
- Log in to the VCC Admin Portal as a supervisor. For information about logging in to the VCC Admin Portal, see Logging in to the Vonage Contact Center Admin Portal.
- Go to Virtual Queues (within Administration). Virtual Queues appears.
Click Create New. A new virtual queue appears.
Provide the following information:
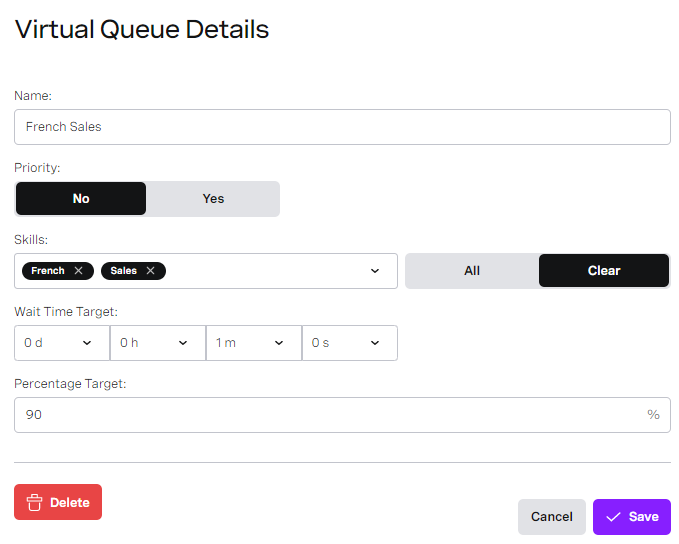
Field Description Name The name of your new virtual queue.
Virtual queue names can only contain numbers, letters, and spaces.Priority If priority call handling is enabled for your account, Priority appears.
Priority determines whether calls that enter this virtual queue are priority calls.
Click Yes to specify that calls that enter this virtual queue are priority calls.
Click No to specify that calls that enter this virtual queue are not priority calls.Skills The skill or skills that the interactions require to appear in the virtual queue.
In the Skills list, click to see the skills that exist in User Admin. For information about User Admin, see User Admin.
Click the name of the skill to add the skill.
Click x alongside the skill name to remove the skill.
Add as many skills as you would like for your virtual queue.Wait Time Target The time in which you want interactions that require the specified skills answered.
Specify the time in the day, hour, minute, and second lists within which agents must respond to interactions in the virtual queue.
Percentage Target The percentage of interactions that require the specified skills you want answered within the target wait time.
Type the percentage of interactions that you want answered within the time you specified in Wait Time Target.
In this example, a virtual queue containing interactions that require French and Sales skills is being created. 90% of the interactions in the queue must be answered within one minute to satisfy the service level agreement.
Click Save. Your new virtual queue appears in the list of virtual queues, sorted alphabetically. Alternatively click Cancel to undo your changes.
How do I edit a virtual queue in Vonage Contact Center?
To edit an existing virtual queue, perform the following steps:
- Log in to the VCC Admin Portal as a supervisor. For information about logging in to the VCC Admin Portal, see Logging in to the Vonage Contact Center Admin Portal.
- Go to Virtual Queues (within Administration). Virtual Queues appears.
- Existing virtual queues appear in a list, sorted alphabetically.
To delete a virtual queue, click the bin icon at the right of the virtual queue you want to delete, and click Delete.
To edit a virtual queue, click the virtual queue you want to edit. The virtual queue appears. Change any of the values in the fields. For information about the fields, see the How do I create a new virtual queue in Vonage Contact Center? earlier in this page. You can also delete the virtual queue from this view.
Click Save. Your edited virtual queue appears in the alphabetical list of virtual queues. Alternatively click Cancel to undo your changes.
Related content
For general assistance, please contact Customer Support.
For help using this documentation, please send an email to docs_feedback@vonage.com. We're happy to hear from you. Your contribution helps everyone at Vonage! Please include the name of the page in your email.
